Dramatic Portrait Retouch Tutorial
Photoshop portrait effects step by step --
Step 1
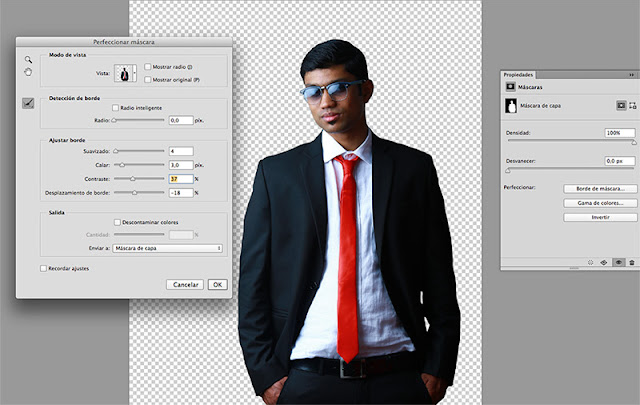
Crop the model from the original background using and selection tool. I used the Pen Tool (P) because it’s more precise. Once you created the layer mask and the background is hidden, refine the edges using the Refine Edge tool.
Step2
Open the background image and blur it using any blurring filter. I used the Gaussian Blur filter. Blur it like in the image below, until you cannot distinguish the details anymore. Put the model over the new blurred background.
Step 3
Create a new layer above the portrait layer and clip it to the portrait. Use the Spot Healing Brush Tool to eliminate imperfections not only on the skin. Next create a new layer above the previously created one and clip it to the layer below too. Now use the Mixer Brush Tool to soften the skin by brushing over it following the shapes of the skin and the shape of the highlights and shadows. When you use these two tools make sure you activate the Sample all layers option from the top options bar.
Step 4
Use the Pen Tool and create a shape covering the glasses lenses, use a dark gray or dark blue color for the shape. Then drop the Fill to about 60% and use the Gradient Overlay layer style using the colors that you like and the Overlay blend mode or some other that looks nice to you. Try to get something like in the image bellow.
Step 5
The original lighting on the model is from the left side so I wanted to emphasize that using a White to Transparent Linear gradient (depicted in the photo below in pink so you can see it better). I used the Soft Light blend mode for this light effect. Lower the opacity of the layer until you like the amount of light you have on the image.
Step 6
Create another light effect using a Radial Gradient of a big soft brush on a new layer with Screen blend mode and a dark yellow color.
Step 7
Now we are going to use the dodge and burn technique to enhance our portrait and make it look cooler. Create a new layer above everything and fill it with 50% gray from the menu Edit>Fill/Contents/50% Gray and change the layer’s blend mode to Overlay or Soft Light. Now use the Dodge Tool and brush over all the highlights of the image using a soft brush. When you’re done select the Burn Tool and brush over all the shadows to accentuate them.
Step 8
Use adjustment layers to create the color effects that you like. I used a Color Balance to modify the colors on the image and a Color Lookup with the Edgy Amber preset at 15% and Normal blend mode and then a Curves adjustment to create a split tone effect.
In order to create the final effect I used the Camera RAW filter to add more Clarity and some light on the Shadows. Camera RAW cannot be used as a filter on versions prior to CC but you can save the image as a JPG and edit it in Lightroom or Camera RAW.


Nice Blog
ReplyDeleteThanks for your comment.
DeleteGood
ReplyDeleteGood
ReplyDeleteHelpful
ReplyDeleteNice
ReplyDeleteGreat
ReplyDeleteGood Job
ReplyDeleteThanks
Delete